I had some leftover bananas that didn't get eaten, and rather than throw them out, I made banana bread with them. This recipe makes the best banana bread I've ever had!
Banana Walnut Bread
Ingredients
* 1 1/4 cups unbleached all-purpose flour
* 1 teaspoon baking soda
* 1/2 teaspoon fine salt
* 2 large eggs, at room temperature
* 1/2 teaspoon vanilla extract
* 1/2 cup unsalted butter, at room temperature, plus more for preparing the pan
* 1 cup sugar
* 3 very ripe bananas, peeled, and mashed with a fork (about 1 cup)
* 1/2 cup toasted walnut pieces
Directions
Sift the flour, baking soda, and salt into a medium bowl, set aside. Whisk the eggs and vanilla together in a liquid measuring cup with a spout, set aside. Lightly brush a 9 by 5 by 3-inch loaf pan with butter. Preheat the oven to 350 degrees F.
In a standing mixer fitted with the paddle attachment or with an electric hand-held mixer, cream the butter and sugar until light and fluffy. Gradually pour the egg mixture into the butter while mixing until incorporated. Add the bananas (the mixture will appear to be curdled, so don't worry), and remove the bowl from the mixer.
With a rubber spatula, mix in the flour mixture until just incorporated. Fold in the nuts and transfer the batter to the prepared pan. Bake for 55 minutes or until a toothpick inserted into the center of the bread comes out clean. Cool the bread in the pan on a wire rack for 5 minutes. Turn the bread out of the pan and let cool completely on the rack. Wrap in plastic wrap. The banana bread is best if served the next day.
The only problem I had was the bottom tore out a bit when I tried to remove it from the pan. Note to self: line the bottom with parchment next time!
Friday, October 16, 2009


Thursday, October 15, 2009
Halloween
It's almost Halloween, and I've come across some interesting websites and blogs about carving pumpkins. The Pumpkin Lady has some nice video tutorials and patterns. Also, I've become fascinated by those really cool pumpkins that have portraits carved into them. There are some tips to create them and how to carve pumpkins in general at Extreme Pumpkins, Cool Pumpkins, and The Pumpkin Wizard. Of course, I probably won't make any of these, but it's cool anyhow.
Here's a really cool pumpkin pic taken by Brian Mitchell Photography as seen on Flickr:
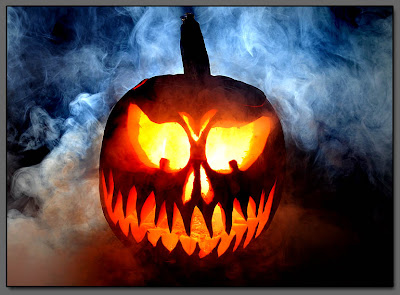
Here's a really cool pumpkin pic taken by Brian Mitchell Photography as seen on Flickr:

Tuesday, October 13, 2009
Project 365!!
So, I've heard about this for a while. Project 365. The concept is simple: one picture a day for one year. Cool idea, I hope I can stick with it! I'm not quite sure what I want it to be, but that's kind of the point for me. It's a journey, not a destination. I hope the impetus of taking at least one picture a day will push the photographic envelope for me both in terms of technique and vision. I'll post the pictures here.
Thursday, October 08, 2009
Back to the blog!
I decided to create a new blog, hopefully to host a few photos as a portfolio of sorts. I'm using a very cool looking template called Photoplus, and the directions for how to post the thumbnails are here.
In a nutshell:
Here's the post model:
*do not include spaces* < alt="A description of the image goes here." longdesc="LINK_TO_THE_FULLSIZE_IMAGE" src="LINK_TO_THE_THUMBNAIL">
Note: The thumbnail size should be 187x128 pixels.
In a nutshell:
How to post on Photoplus
Your posts on photoplus should be only an image tag. This means that the title will not be shown on the main page, it has only SEO purposes. Same thing with Labels, It will serve you only to organize the main menu.Here's the post model:
*do not include spaces* < alt="A description of the image goes here." longdesc="LINK_TO_THE_FULLSIZE_IMAGE" src="LINK_TO_THE_THUMBNAIL">
Note: The thumbnail size should be 187x128 pixels.
Subscribe to:
Posts (Atom)